Today, is the final article in our series on some of the common questions on troubleshooting the Series 6100 and S6103. The full user and service manuals can be found here.
Part 1 looked at what to do if your display does not come up, while Part 2 and Part 3 focused on what to do if you are seeing issues with flow. Part 4 looked at what to do when you were not getting any ozone regardless of the command. Part 5 and Part 6 looked at a variety of ozone issues in the Series 6100 specifically, while Part 7 looked at ozone issues with the Series 6103. Last time, in Part 8, we began to look at photometer related issues in the 6103.
Today, we will wrap up with how to troubleshoot a noisy photometer in a Series 6103.
Let us know if you have a specific issue you’d like us to cover!
Note!!: Customers who work on their units accept the risks of working on machinery and are responsible for taking all proper safety precautions. If in doubt, contact our service department! NEVER unplug the ozone or photometer lamps while the unit is powered on. This can damage the circuitry.
System built after 11/2002 use a chassis with hinged side panels. This allows the side panels to be dropped for troubleshooting purposes. The cable lengths will allow the system to be powered on while the panels are dropped. However, always power down before dropping the panels.
Noisy Photometer
As always, begin by verifying that all of the calibration data is properly entered in the System setup. This includes the ozone calibration, photometer calibration and you ADCs/DACs.
Make sure that external electrical noise is being controlled. If unsure, add a UPS/power conditioner. It is also important to make sure the system cover is on and the screws are secure to create better chassis ground and make the system less susceptible to electrical noise.
Next, be sure that the REFERENCE port pressure is not too high or too low. The optimal pressure is between 20 and 30 PSIG.
Insufficient gas for the photometer will also create noise. The photometer requries 2 LPM. Make sure this 2 LPM is considered when deliverying gas to external analyzers.
Make sure that the photometer lamp (red arrow) is backed out slightly in the block and that the thermistor (blue arrow) is bottomed out.
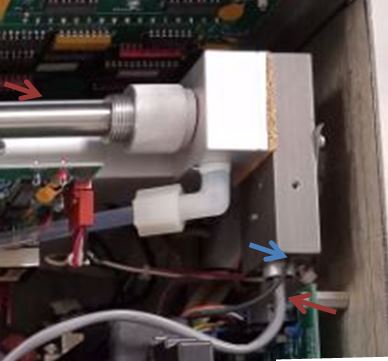
Once you have checked these items, make sure that your photometer tube is clean and the glass windows of the photometer assembly are not chipped.The tube can be removed by loosening the knurled knob (blue arrow), which is done by rotating counter clockwise. It is best to use compressed air to clean out the tube.
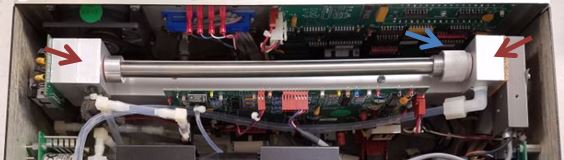
Making sure the unit is turned off first, you can then visually inspect the glass windows (red arrows) to check for cracks or chips around the edges. Once reassembled, you will want to run the built-in leak test as follows:
- Be sure there is a source of gas connected to Port 1 at 25 PSIG.
- Select the LEAK function from the Main Menu, and then press START. The software will acquire Atmospheric Pressure, and then prompt for the outputsto be capped.
- Cap the Output Manifold, Vent and Exhaust ports. Use the caps supplied with the system.
-
- Press OK. The Leak Test will fill the volume of the system plumbing with gas from Port 1 to 5 PSIA above atmospheric pressure, and use pressure decay to calculate the leak rate. Any leak in excess of the maximum leak specification for the system (3 SCCM) will be displayed.
- The final step to troubleshoot is that the pump intact or outlet valves are not sealing properly. This will also cause low photometer readings, as you will have reference gas mixing in with sample gas. To test, place a small amount of restriction on the EXHAUST port (such as a 6″ piece of 1/8″ tubing). With the photometer loop OFF, in either FLOW or CONC mode, you should see the ozone level significantly drop and become very noisy. This is an indication that the pump intake or outlet valves have become partially blocked. We recommend that the unit be returned to our service department for a tuneup.
If you need further assistance or to order replacement parts, Contact us!
I hope you have found these troubleshooting tips helpful! If you have specific topics you would like us to cover, let us know. Subscribe above so you don’t miss a thing!